Cabin Filter Replacement and Heater Motor Removal
NOTE: This repair was done on my 1994 C280. However it may work for other
years/models. I cannot guarantee 100% accuracy nor can I be liable for any
damage one can cause to his or her car or self.
Replacing the cabin filter is a good idea to do every couple of years because
it can get clogged up and severely diminish your heating and air conditioning.
While I was under there, I also decided to lube up the bushings on the blower
motor as they were starting to make noise after long trips.
The cabin filter can be bought from the dealership, or from online retailers
such as http://www.importec.com
The part number for the filter is 210 830 08 18.
It usually costs around $30 but may be cheaper online.
Step 1: Remove the passenger side knee bolster. This is done by unscrewing the
three Philips screws that are under the dash right at the edge where the glove
box and the bolster meet. There is also an air louver on the console area that
needs to be removed by turning the plastic screw exactly 90 degrees. Slide the
knee bolster (lower dash cover) backwards and it will drop out. See the picture
below.

CABIN FILTER REMOVAL:
Step 2: Once the knee bolster is removed, you can see the cabin air filter
cover, and also the blower motor cover. I will continue on with the
instructions to remove the cabin air filter. Simply slide the two locking clips
to the outsides and pull the cover off.

Step 3: After the cover is removed, the filter can be pulled out. Note the
orientation of the filter as you remove it so that it can be put back in
easily. Once the new filter is in, simply put the cover back on, and slide the
clips toward the middle.
BLOWER MOTOR REMOVAL:
Step 2: With the knee bolster still removed, on the right of the cabin filter,
there is a squarish cover. This cover contains the blower motor. Slide the
clips from towards the middle of the unit. And then pull outward to remove the
cover. There will then be several wires. On the inner part of the motor itself,
pull off the Red and the Blue wires from the motor.

Step 3: From here, depending on the year, the number of screws, and the
orientation may vary. My particular model had 4 Torx screws to remove the
actual unit. There was a small little box of wires (this is the heater
regulator) that also had to be unscrewed from the fan unit. Once these screws
were removed, the unit was free to come out of it's housing.


Step 4: Now that the unit was out, I cleaned it up with compressed air, blew
all of the dust off. I then used oil to lubricate the bearings on either side
of the motor.
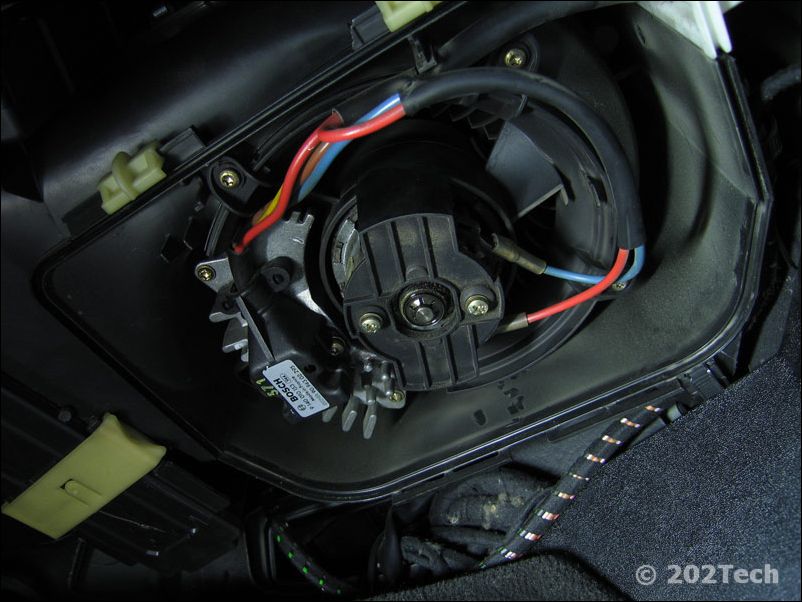
Step 5: Installation is reverse of removal. Be sure to remount the heater
regulator as it needs the heatsink to cool it correctly. Once the wires are
reattached, it should look like the picture below.

Reinstallation of the knee bolster is reverse of removal also. Make sure to
slide the two clips on the middle and back of the bolster into their respective
slots. Then rescrew the three screws. Finally, reattach the air louver.
© Copyright. 202Tech. 2019.


